
Explore Knowledge Articles
Back
RRST-8ANS Sunnata RF Switch
HRST-8ANS Sunnata RF Switch

Application Note #793 - Sunnata Switch MyLevel Personalization
Sunnata Models
ST-6ANS Sunnata SwitchRRST-8ANS Sunnata RF Switch
HRST-8ANS Sunnata RF Switch
Overview
MyLevel personalization gives you the ability to customize your Sunnata switch. From the main switch only, you can adjust the brightness of the light bar or turn off the locator light using MyLevel personalization. MyLevel personalization cannot be entered from a companion switch. Companion switches will match the settings of the main switch.
Identify your main switch:
Pull the FASS (Front Accessible Service Switch) out and push it back in. If the light bar blinks, this is your main switch. If not, go to your next location in your installation and repeat until you locate your main switch.
Easily adjust your switch in 4 steps:
- Enter MyLevel
- Light Bar Brightness Mode
- Light Level Indicator/Locator Light Mode
- Exit MyLevel
Switch


Glossary
| Default Setting | The way the feature operates when the control is first used. |
| Factory Default | The way all the features operate when the control is first used. |
| FASS | Tab at the bottom of the control, required to be pulled out for light bulb(s) replacement and entering MyLevel personalization mode; also known as Air Gap. |
| Light Bar | The small bar on the upper right side of the Sunnata switch paddle. |
| Light Level Indicator | The light bar is illuminated to display that the load is on. |
| Load | The light or motor that the Sunnata switch is controlling. |
| Locator Light | The light bar’s brightness is faintly illuminated when the load is OFF. |
| Normal Operation | Standard use of control (ON/OFF); indicator lights will not be flashing. |
| Tap | Momentary activation of the ON/OFF button. Less than 1 second. |
Using MyLevel
MyLevel consists of a series of four steps. Two of the steps are adjustable features.
- Enter MyLevel
- Light Bar Brightness Mode
- Light Level Indicator/Locator Light Mode
- Exit MyLevel
- Notes:
- – The MyLevel settings are saved when the control transitions from one mode to the next.
- – The control will automatically exit MyLevel after 1 minute of inactivity.
- – MyLevel cannot be entered from a companion switch location.
Enter MyLevel
-
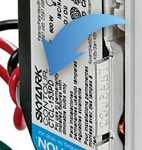
Pull the Front Accessible Service Switch (FASS) out to the open position.
-
Press and hold the
button.
-
While continuing to hold the
Service Switch (FASS) in to the closed position. Continue to hold the
flash ON and OFF at a rate of ~4 times/second. -
Release the
Light Bar Brightness Mode
Selection Feedback
Select between high-, medium-, and low-brightness of the control’s light bar. Default - Medium brightness.
- The light bar will flash 1 time/second with 3 seconds between repeating flash patterns.
- The 3 second delay is reset when changing light bar settings.
- The flash patterns for the light bar setting are as follows:
- — 1 flash: Light Level Indicator ON / Locator Light ON (Default)
- — 3 flashes: Light Level Indicator ON / Locator Light OFF
- — 5 flashes: Light Level Indicator OFF / Locator Light ON
- — 7 flashes: Light Level Indicator OFF / Locator Light OFF
Selection
-
Tapping the
button will cycle through the different options.
Exit
-
Tapping the
Exit MyLevel
Exit
-
- Hold the
- MyLevel is automatically exited after one minute of no button activity
- The main control sends updated LED settings to the companion switch(es).
- Hold the
Restore Factory Default Settings
The switch can be returned to its original factory settings. This allows the customer a risk-free experience to try multiple settings.
- Triple tap the
- Continue holding until the light bar begins to flash quickly (~3 seconds).
- Immediately triple tap the
- The light bar will flash slowly until the process is complete and normal operation will resume.
Note: While the main switch is restoring factory default settings, the light bar on the companion switch will be flashing and the buttons will be disabled.
System Features (HRST and RRST Models Only)
Some switch behavior features can only be adjusted through the Lutron Designer software.
- Delay-to-Off (DTO) Time: Allows for control over how quickly / slowly the load turns off. This setting delays the time between when the OFF button is pressed (normal operation) and when the lights actually turn off.
Was this article helpful?
Thank you! We appreciate your feedback!